Showing posts with label made by me. Show all posts

Thursday, April 4, 2013

Six Month Sew-iversary! THE TOPS

Thank you all for your kind comments on my last post. You guys may have to scale back your shock and awe after you see the rest of the garments, though. I'm counting some super easy tops and even two slips and some leggings in the count, so I think the number sounds more impressive than it really is. However, I will admit that I have definitely become a sew-aholic. The urge to sew is strong with this one!

Onwards and upwards to the things I've sewn that are loosely qualified as TOPS, including but not limited to tunics, t-shirts, sweaters, tank tops, and things only suitable for layering under other things. Here are the ones you have already seen on the blog:

01.22.13Clover and Scout Tee 2- Made by Me
Tiny Pocket Tank FrontBlank Canvas Tee plus Alabama Chanin Tunic front

And here are the newbies:

Tiny Pocket Tank V2M6398 V1
Grainline Studio Tiny Pocket Tank V2 (in jersey) // McCalls 6398 V1
 Alabama Chanin Fitted Tank V1Alabama Chanin Fitted Tank V2
Alabama Chanin Fitted Tank V1 // Alabama Chanin Fitted Tank V2
 M6658 B V1M6566 V1
McCalls 6658 V1 // McCalls 6566 View D V1

Ughh, I can think of at least one sweater I forgot to photograph (Dixie DIY Hot Cocoa Sweater)! I'll try to update that at some point... maybe....

UPDATE! Here it is.
Hot Cocoa Sweater V1
Dixie DIY Hot Cocoa Sweater V1

Up next: things that cover the bottom half of my body.

 signature2

Monday, April 1, 2013

6 Month Sew-iversay!?! THE DRESSES

Hear ye!  Hear ye!
Its my six month sew-iversay! 
Is that thing? I don't care! Champagne and cake all around! 

Green Leaves 123112Blue Ballet Dress
gray pattern tiramisusweatshirt dress

Above, you can see the stuff that has already been blogged (like software, the V's refer to the version number). Below, you can see the other stuff. I'd say these photos pretty well illustrate the fact that I have grown a little... uninspired trying to back blog all the garments that I've made. I feel like I'm trying to play catch-up and it makes it hard to focus on the new stuff. Plus, some things just don't deserve a whole blog post, though I do want to keep a record of most everything I've made just so I can keep track of the evolution of my sewing through time. So, here is a major photo dump of things unblogged thus far: THE DRESSES

 floral ballet dresspolka dot ballet dress
Dixie DIY Ballet Dress V1 (muslin; now wearable for festivals!) // Dixie DIY Ballet Dress V2 (muslin; now wearable with shorter sleeves!)
self drafted everyday dress v1solid gray tiramisu
Self Drafted Everyday Dress V1 // Tiramisu V2
basic tank dress v2 
Basic Tank Dress V2

I had a major photo session this weekend (lots of wine and some quality time with the self timer on my camera) and I think I've got everything photographed that  I've made up until the six month point. Today, the dresses. Tomorrow, the rest of it. I did full photo sets for all of the garments so some (if not all) will get their own blog posts at some point. Let me know if you would like to hear the details on anything specifically, otherwise I suppose I'll just choose at random. I'd also like to make sort of a "projects" page that would have a thumbnail photo of each garment and a link to that garments full write up. This would be mostly for my reference, but might be useful for others as well. Anyone have any clue how to do that in blogger?

And for the SIX month grand tally:
29 finished objects for ME
3 finished objects for OTHERS  

I'm only counting the wearable stuff here, there have been a few wadders. And trust me, the wearable stuff gets worn most days.  I'm quite pleased with that fact, since I started sewing so that I could create the garments that I've always looked for in stores but have never been able to find. For example, jersey knit dresses with sleeves? Now I have seven (seven? wow!)!
 
Also, don't forget to drink your champagne! Bottoms up, ladies. 


 signature2

Wednesday, March 20, 2013

Blank Canvas Tee + Alabama Chanin

Blank Canvas Tee plus Alabama Chanin Tunic


Sweater: Woman Within
Tunic: Made by me, Blank Canvas Tee pattern + Alabama Chanin modifications
Jeans: Target
Shoes: Uggs

Sorry to be MIA for a couple of weeks there, things got crazy at work and I had some house guests. Blah, blah, blah. Let's just say I'm relieved to have the time to get back to sewing and blogging! I have SO MUCH on my to-sew list. 

I completed this project back in January (I think), right after I bought myself the very exciting new Alabama Chanin Studio Style book for my birthday! The birthday presents that you give yourself are always the best, aren't they? You always get just what you want!

Blank Canvas Tee plus Alabama Chanin Tunic front

 I wouldn't say the creation of this tunic was exactly intentional, but thats ok! I like how it turned out! I was trying, mostly unsuccessfully, to make a second version of the 3 Hours Past Blank Canvas Tee. I think the pattern is just drafted for someone that is much more well endowed in the boob-al region than I am and I can't for the life of me figure out how to fix it. I've downloaded the Maria Denmark Kristen Kimono Tee in hopes of further investigating this kimono tee thing. I really kimono sleeves- in theory. In actuality, they haven't treated me that well yet. 

Blank Canvas Tee plus Alabama Chanin Tunic front 2

Anyways, I had dyed up about a yard of the nine yards of white jersey fabric I bought for a steal of a deal in Dallas over Christmas vacation and was trying to make it into a tunic length Blank Canvas kimono sleeve tee. I had the reached the point of wadding up the project and leaving it on the floor for the dog to chew desperation when my Alabama Chanin book arrived! Inspiration struck! I cut the failure of a tunic down the front and used the center front seams and neckline of the Fitted Top pattern to remove a large chunk of fabric from the center front and create a much more fitted silhouette through the bust. Of course, it required a bit of grading. 

Untitled

I can go into the details later if anyone is interested. I seriously think that this pattern is SO FLATTERING and have made up a tank top since and am currently working on a dress. I finished the seams on the machine, since I had already started the tunic that way (all Alabama Chanin stuff is supposed to be hand sewn), and then figured I would add some more Alabama Chanin flair in the form of some hand embroidery on the neck and sleeve bindings. 

Blank Canvas Tee plus Alabama Chanin Tunic sleeve

After much consulting with the book, I managed to do a passable job. I seriously had zero experience with embroidery, especially on a knit fabric, so if I can do it you can too! I used one of the illustrated stretch embroidery stitches on the neckline and sleeve bindings and top stitched the front and side seams with embroidery thread. Surprisingly, the top stitching added a nice bit of heft to the entire top, making it much less clingy than it would have been otherwise, considering the cheap fabric that I used. 

Blank Canvas Tee plus Alabama Chanin Tunic neckline detail

The neckline is a bit big and gapey due to the fact that I didn't approach this tunic with even the faintest idea of how it would turn out, but its fine for causal wear or with a tank top underneath for the office. 

Untitled

Anybody else working on some Alabama Chanin stuff? Want to compare notes? I have to say that I am fully obsessed but am still a bit terrified of tacking the applique/ reverse applique section, not to mention the beading! Plus, nothing makes you feel better about spending all your time watching season two of Game of Thrones very intellectual TV than hand sewing using heirloom techniques. 


  signature2

Thursday, March 7, 2013

Finished: Grainline Studio Tiny Pocket Tank V 1.0 (and bonus V 2.0)

Tiny Pocket Tank Brown Skirt

Sweater: Anthropologie
Shirt: made by me, pattern: Grainline Studio Tiny Pocket Tank
Skirt: made by me, self drafted
Leggings: made by me, self drafted from Etsy tutorial
Boots: Vintage, Etsy
 
Whoa, this is a blast from the past. Don't worry, we don't have this much snow on the ground now!! I'm playing catch up here. This shirt was the second thing I made and now that I've blogged about it, I've covered the first, second, and third me-made items and the progression of things is a bit foggy after that so you can expect any sense of order to get thrown out the window!

Tiny Pocket Tank Front

Being the second thing I made, this one was fairly straightforward. Plus, I don't really remember what happened! So just enjoy the photos.....

Tiny Pocket Tank back

I had this fabric in my stash for a while. I think I bought it in the clearance bin with the intent of recovering the throw pillows on my sofa, but never did it because it was really just too lightweight for pillows. That made it perfect for this shirt! It almost has a linen like texture and I LOVE LOVE LOVE the print. Seriously. Love. 

Tiny Pocket Tank pattern detail

I cut a size 18 on this one, and like the Scout Tee pattern, it was a little small through the hips. Thats ok, I still wear it all the time anyways. Because I love the print. Obviously. Next time I think I will grade it out a little through the hips and make it a tiny bit longer. This fabric tends to wrinkle up pretty badly while I wear it, causing it to get shorter throughout the day and causing me to have to iron it before I put it on in the morning. Ironing is really NOT one of my favorite morning activities. In my list of favorite morning activities, it falls significantly behind enjoying a shower, drinking tea, and sleeping an extra 5 minutes because I don't have to iron.

Tiny Pocket Tank neckline

I botched the neckline a bit, I think I had seen too many Sorbetto's with the visible bias binding and thought that was what I was aiming for even though the directions in pattern were very clear. The next time I used bias binding on a neckline I consulted Jen of Grainline Studio's tutorial, and it went much more smoothly (though trust me, I'm still working on this technique). Speaking of the second time I made the Tiny Pocket Tank....

Untitled

Here is an awful photo of the version I made for my sister for her birthday back in November. She swears that she loves it, but I haven't seen her wear it yet. But maybe that's because she lives in Florida. 

All in all, I count this pattern as  win and I see quite a few more in my future. I don't wear a lot of things without sleeves (until it gets unbearably hot in the summer and I throw my sleeves required rule out the window), so I was skeptical about how much use this would get. As it turns out, its a FANTASTIC layering piece!


 signature2

Wednesday, February 27, 2013

Stretch and Sew V 1.0 a.k.a the Sweatshirt Dress


 sweatshirt dress

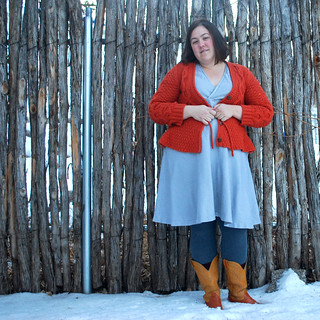
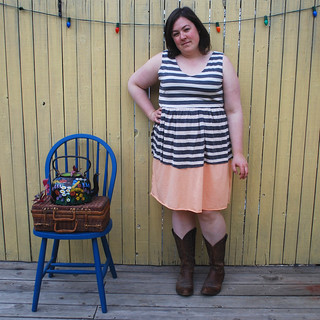
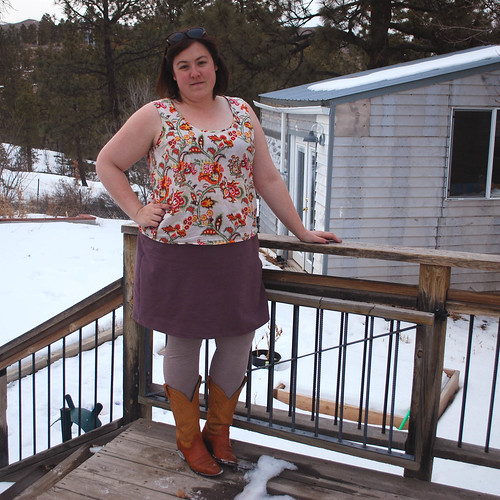
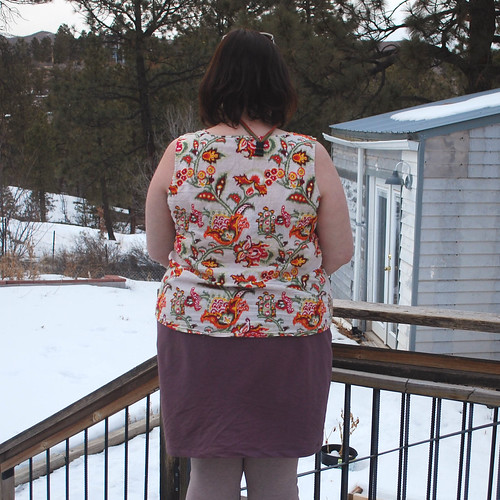
Dress: Made by me, Pattern: Stretch and Sew 305, Fabric: French Terry
Leggings: Made by me, Pattern :Etsy blog DIY leggings tutorial, Fabric: Jersey
Boots: Honey Blossom Studio on Etsy

 One of the items of clothing that I have been searching for FOREVER is a sweatshirt dress. I mean, a sweatshirt dress sounds awesome, right? You can wear it around the house on Sunday when you are doing your cleaning and its almost respectable enough to wear to the grocery store. Its great for long car rides in the winter and lounging around the ski chalet shack when on ski vacation with friends. Its probably even great for the airplane! And yet, for some reason, NO ONE makes a sweatshirt dress. Or rather, if they do make a sweatshirt dress its too short or too small or sack-like (and literally a thousand dollars) or too ugly or actually just a sweatshirt that someone is trying to pass off as a dress. Trust me, I have been looking for the elusive sweatshirt dress for a VERY long time. 

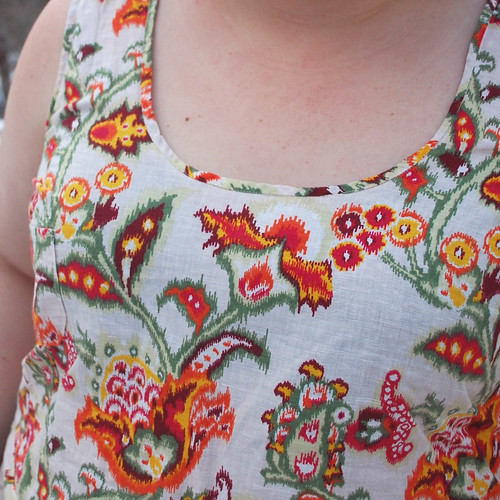
But now... now I can make one! Hurray! And when is stumbled upon this dated, ugly ass retro pattern at the local thrift store for 30 cents, I figured I would give it a shot. Its the 1977 special: Stretch and Sew 305 and I haven't found any reviews or info about it on the great, wide interwebs. And if I can't find it on the interwebs, that means I'm the only person who has ever sewn this pattern, right? That's what I'm telling myself, it makes me feel adventuresome and special. And helps me excuse my mistakes!

Thrift finds

Sorry for the shoddy photo, here is a scan from Vintage Patterns Wikia.And, if you are so completely green with envy over my dress that you need your very own NOW NOW NOW, there are conveniently a few patterns for sale on Etsy right now.


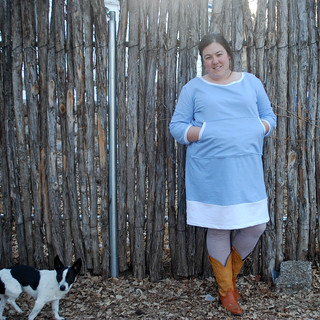
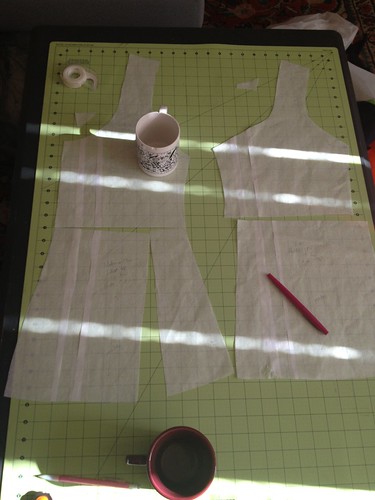
 See, this pattern contained everything I wanted, but not everything I wanted all in one version! I NEEDED a pouch pocket on the idealized version on my sweatshirt dress that was currently only residing in my brain, and I definitely did not want a cowl neck. I am not a cowl girl. Also, it needed a bit of grading up (story of my life). So, I added about an inch at the center seam (since the pattern is cut on the fold, this is the easiest way to add just a bit of width to the pattern: just line the pattern piece up on the fold then move it over an inch). Unfortunately, as is common with many 70s dresses I saw in my vintage clothes selling days, the top and the bottom are all one piece with an elastic casing around the waist. This means that to accommodate my badonka donk, I had to grade up the entire pattern piece, rendering the top section of the dress way too large. I guess it would have worked if I was going to for that late 70s blousey look the lovely ladies on the pattern envelope are sporting, but that didn't end up working too well with my fabric of choice. Lets keep track here: Mistake 1.

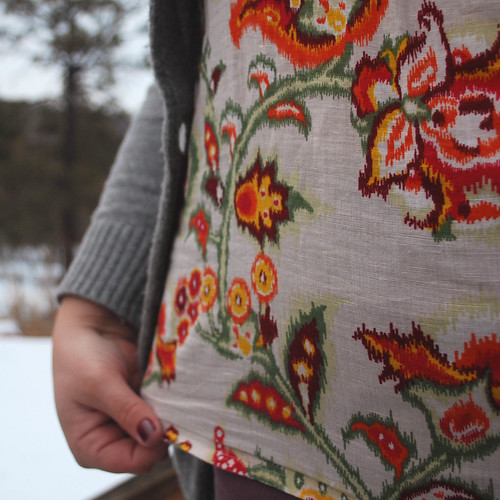
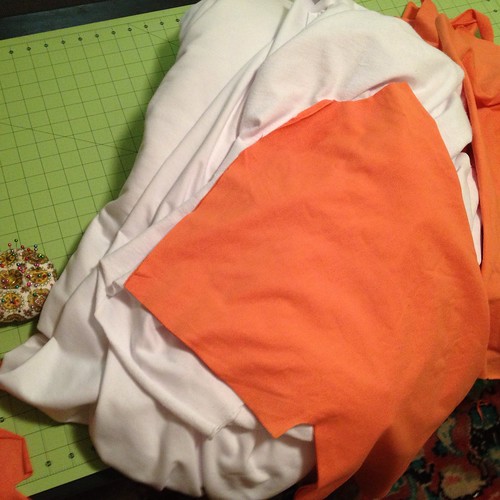
Speaking of my choice of fabric, did I tell you about this ridiculous mound of white french terry that I purchased in the discount fabric district in Dallas for $3 a yard while visiting my parents at Christmas? No? Well, here it is (with some of it dyed orange). Its even too large to fit in one photo!

Untitled

I'm not entirely certain what I thought I was going to do with 9 yards of french terry, but $3! per yard! what! I couldn't pass it up. And I am slowly trying to work my way through it. Turns out it doesn't hold dye as well as I thought it would, though. This dress was supposed to be navy. Yeah. Mistake 2.

Anyways, back to the sewing saga. Well, in the process of distracting myself with the VERY CHALLENGING grading, I accidentally cut the front neckline on both the back and front pieces and quickly realized that I was screwed. Mistake 3. Fortunately I wasn't planning on using the cowl neck anyways. 

sweatshirt dress back

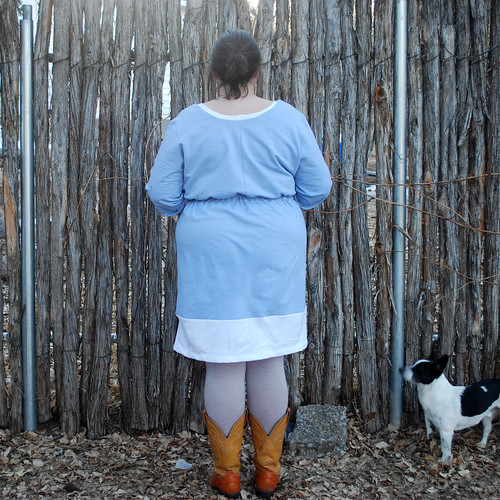
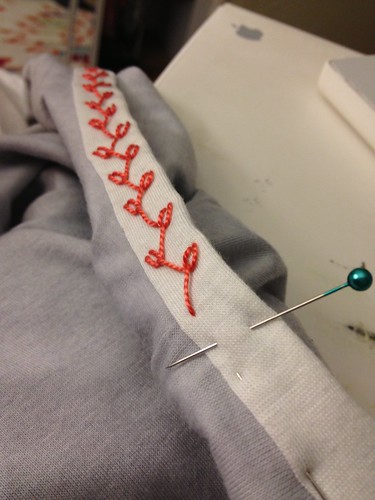
Following the directions, I applied the binding to the edges of the pocket and stitched, folded over, and top-stitched the top part of the the pocket. The directions only allow for the pocket on the shirt version of the pattern, with the edges of the pocket being sewn up in the side seams and the waistband. I figured I could top stitch those down later, using a regular old sweatshirt as a guide for construction, but I had to apply the casing first to avoid creating a catastrophe. At that point, I serged the shit out of the side seams (it still feels very dramatic when I use my new serger) and tried the thing on. Yeah, way too big on the top half ( a result of Mistake 1) and the back neckline was way too low (a result of Mistake 3). Here is where I started fixing things. I sewed a massive dart (about 2 inches wide at the top) down the center back to the waistline. Hopefully it just looks like a center back seam. It helped massively with the fit through the shoulders and removed some of the blousey-ness through the bodice. Its still a little big in the front, but trust me, its a MAJOR improvement. 

sweatshirt dress pocket

I applied the casing and elastic as directed and then finished up the pocket by sewing down and top stitching the sides of the pocket and then the bottom of the pocket. The pocket is pretty wide and I would venture to say it would look better if it was a bit less wide, but I was OVER it at this point. I tried the dress on again and guess what? It was WAY too short! Mistake 4. 

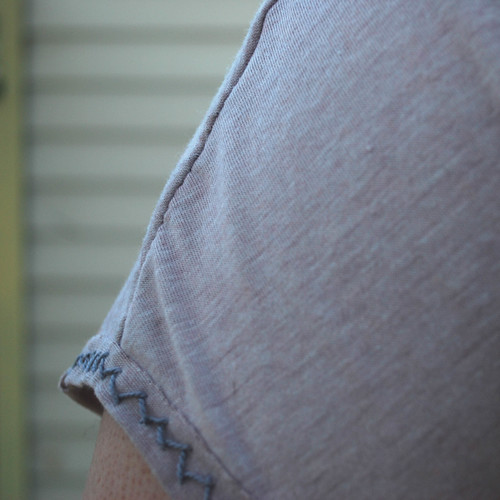
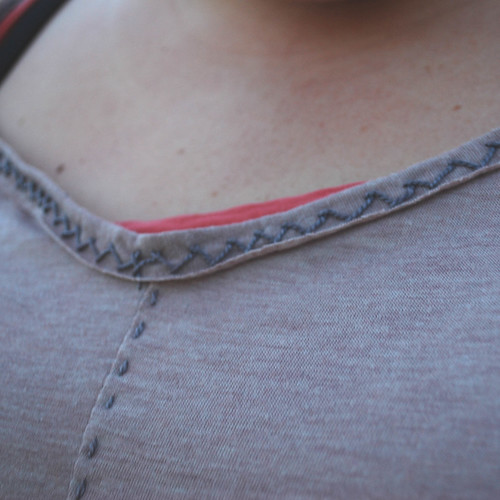
Well, at this point I was ready to embrace the "make it work" moment. I was out of the pre-dyed "navy" fabric, but fortunately I still had at least 6 yards of that white french terry laying on my floor. Good thing color blocking is trendy right now! I cut out a nice long panel, sewed it on to the bottom of the dress, and then hemmed it up to a length I liked. My serging skills are a bit lacking so the side seams at the the intersection of the panel and the dress are a bit wonky. I finished things up by applying knit binding made of the white french terry to the sleeves and neckline and the put a fork in it and called it done!

 sweatshirt dress side

By some miracle clearly contrived by the sewing fairies, I managed to end up with a wearable finished project that ticks most of my sweatshirt dress boxes! I have indeed worn it to clean the house and go to the grocery store and will be certain to wear it on my next ski vacation. I haven't washed it yet, so I'm keeping my fingers crossed that the dye job doesn't run or fade too badly. 

And that, my friends, is the saga of the sweatshirt dress. Whew!

 signature2

Tuesday, February 12, 2013

Finished: Grainline Studio Scout Tee V 1.0


Clover and Scout Tee 2

Pants: Made by me (Colette Clovers)
Shirt: Made by me (Grainline Studio Scout Tee)
Shoes: Nine West Outlet

Here is is, my fist (and only finished- the second version has ended up in the unfinished object pile) Grainline Studio Scout Tee. I do believe this is the third patten that I tackled in my sewing adventure; the first being the Dixie DIY Ballet Dress and the second was the yet unblogged Grainline Studio Tiny Pocket Tank. I can't say enough good things about the patterns that Jennifer at Grainline Studio creates. Most include up to size 18 and her instructions have lots of pictures and details, perfect for beginners. Plus, all of her patterns are great MODERN basics, with an emphasis on the modern. Nothing frumpy or frilly over at Grainline, which is just what I like!

Scout Tee Back

Here is the embarrassing back view! I think the front view has tricked you into thinking this shirt fits me well, but alas, no. In the back, the fabric bunches up over my hips as soon as I move. I neglected to grade up this pattern even though my hip measurements are 5 inches larger than the size 18 that I cut. I'm not sure what I was thinking- chalk it up to beginners error!

Scout Tee Fabric

However, I love, love, love the fabric (super cheap from Fabulace on Etsy) and I always get compliments on the shirt when I wear it, as long as I am wearing a cardigan to cover up the backside! And yes, I do typically wear a tank top under this sheer fabric, don't worry.

Scout Tee Sleeve

I think the little sleeves are just adorable in this fabric. This was my first time setting in sleeves in a woven fabric and I think it went alright, thanks to the pattern's great directions. 

Scout Tee Inside

As you can see, I finished the neckline and sleeve seams with pre-bought bias binding, I knew there was no way I would be able to make bias tape out of this slippery chiffon! I'm still not really sure what the proper way to finish sleeve seam allowances might be, but this mostly works, though it is a little tight through the armpit now. The size seams are french seams and are holding up great, even with repeated machine washing (don't tell, I'm sure I'm not supposed to machine wash something this delicate!). 

So.... back to the second version of this shirt, which is turning out to be a real wadder. In fact, its been on the floor of my spare room for at least two months! I attempted to grade the pattern up, but its looking awful! I'm not sure if its the cheap fabric I'm using or my grading skills, but it needs some serious help (and maybe a full bust adjustment, though I really don't have a full bust for my size). Maybe it has metamorphosed into something beautiful during its time on the floor. Perhaps I'll un-wad it and see how it looks. In the mean time, I'll be studying Susan at Moonthirty's beutifully fitting versions. I've got my fingers crossed that she'll post some photos of her altered pattern so that I can copy study them. Oh, wait, she has already done that! Duh, guess I should have referred to this BEFORE cutting my fabric. Thanks, Susan! Perhaps it can be salvaged.  

 signature2