Tuesday, February 12, 2013

Finished: Grainline Studio Scout Tee V 1.0


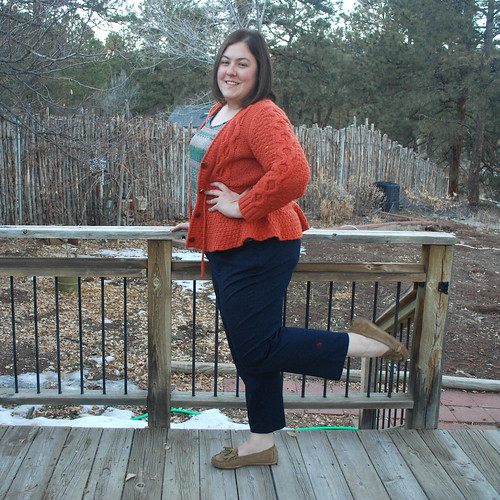
Clover and Scout Tee 2

Pants: Made by me (Colette Clovers)
Shirt: Made by me (Grainline Studio Scout Tee)
Shoes: Nine West Outlet

Here is is, my fist (and only finished- the second version has ended up in the unfinished object pile) Grainline Studio Scout Tee. I do believe this is the third patten that I tackled in my sewing adventure; the first being the Dixie DIY Ballet Dress and the second was the yet unblogged Grainline Studio Tiny Pocket Tank. I can't say enough good things about the patterns that Jennifer at Grainline Studio creates. Most include up to size 18 and her instructions have lots of pictures and details, perfect for beginners. Plus, all of her patterns are great MODERN basics, with an emphasis on the modern. Nothing frumpy or frilly over at Grainline, which is just what I like!

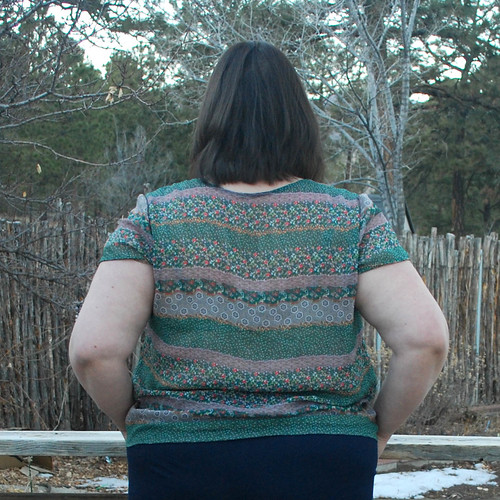
Scout Tee Back

Here is the embarrassing back view! I think the front view has tricked you into thinking this shirt fits me well, but alas, no. In the back, the fabric bunches up over my hips as soon as I move. I neglected to grade up this pattern even though my hip measurements are 5 inches larger than the size 18 that I cut. I'm not sure what I was thinking- chalk it up to beginners error!

Scout Tee Fabric

However, I love, love, love the fabric (super cheap from Fabulace on Etsy) and I always get compliments on the shirt when I wear it, as long as I am wearing a cardigan to cover up the backside! And yes, I do typically wear a tank top under this sheer fabric, don't worry.

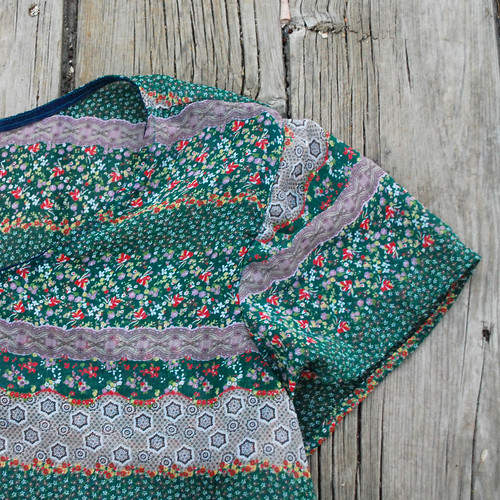
Scout Tee Sleeve

I think the little sleeves are just adorable in this fabric. This was my first time setting in sleeves in a woven fabric and I think it went alright, thanks to the pattern's great directions. 

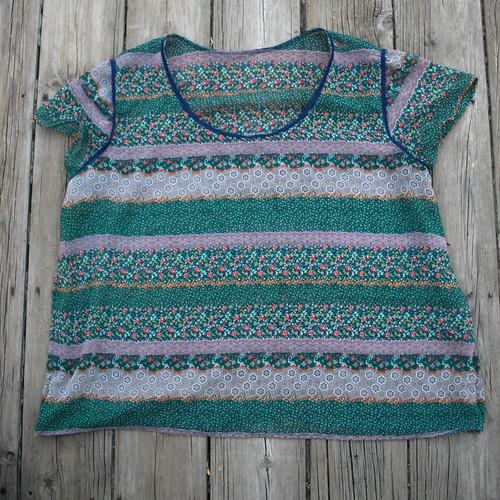
Scout Tee Inside

As you can see, I finished the neckline and sleeve seams with pre-bought bias binding, I knew there was no way I would be able to make bias tape out of this slippery chiffon! I'm still not really sure what the proper way to finish sleeve seam allowances might be, but this mostly works, though it is a little tight through the armpit now. The size seams are french seams and are holding up great, even with repeated machine washing (don't tell, I'm sure I'm not supposed to machine wash something this delicate!). 

So.... back to the second version of this shirt, which is turning out to be a real wadder. In fact, its been on the floor of my spare room for at least two months! I attempted to grade the pattern up, but its looking awful! I'm not sure if its the cheap fabric I'm using or my grading skills, but it needs some serious help (and maybe a full bust adjustment, though I really don't have a full bust for my size). Maybe it has metamorphosed into something beautiful during its time on the floor. Perhaps I'll un-wad it and see how it looks. In the mean time, I'll be studying Susan at Moonthirty's beutifully fitting versions. I've got my fingers crossed that she'll post some photos of her altered pattern so that I can copy study them. Oh, wait, she has already done that! Duh, guess I should have referred to this BEFORE cutting my fabric. Thanks, Susan! Perhaps it can be salvaged.  

 signature2

Saturday, February 9, 2013

OMG!

Here she is! My new Brother 1034d. I know how I'm going to spend the remainder of my weekend....

New brother 1034d

Any advice welcome!

On a less expensive note, here are this weekend's thrift finds. Two sheets for muslins, a groovy (and possibly awful) 70s pattern, bemberg rayon in gray, tracing paper, and a couple of yards of blue fabric that I'm a little on the fence about. All for 10 bucks!

Thrift finds

In other news that is only exciting to me: summer holiday plans are solidified! 

Middle Fork of the Salmon
(photo borrowed from EchoTrips on flickr)

Heaven willing and the creek don't rise (or fall), I'll be spending a week on the Middle Fork of the Salmon River in Idaho, alternating between lounging on a raft with a beer in my hand and trying not to die in the rapids. A friend of a relative of a friend somehow scored a much coveted (in the boating community) permit and I was lucky enough to get invited along. This is a once in a lifetime trip (though with any luck, I'll be able to repeat the feat). Preparing gear sewing plans as we speak!

397665_626081520898_885390358_n.jpg
My Dad and me in Desolation Canyon on the Green River last summer, chillaxing on the raft under the umbrella.

 signature2

Tuesday, February 5, 2013

Finished: Colette Patterns Clover Pants


Clovers and Scout Tee


Pants: Made by me (Colette Clovers)
Shirt: Made by me (Grainline Studio Scout Tee)
Cardigan: Anthropologie
Shoes: Nine West Outlet

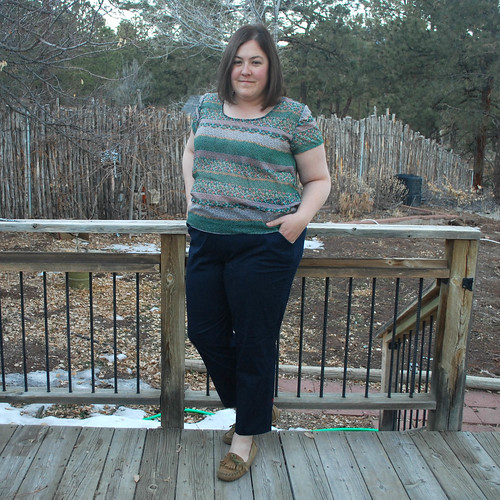
OOOOOOOOOH, Hey yo! The Colette Pattern Clover Pants are finished. I MADE PANTS! Can you sense my excitement? Whether or not I could/should wear them out in public is debatable, but we'll get to that later. I also made the Apple Wine that I am drinking while writing this post, and its of unknown alcoholic properties, so proceed at your own risk. 

Brief programming note: I'll blog about that delightful Grainline Studio Scout Tee later in the week. Onward to the pants................!

Clover and Scout Tee 2

Like many other plus size ladies and sewers and plus size sewer ladies and just ladies in general, I have an AWFUL time finding pants that I like and are (at least somewhat) flattering. I've had my eye out for some straight-leg, slim-fit, high-waisted pants to wear with longer tops and tunics for a couple of years now. Once I decided this sewing thing was going to work, I directed my laser-like vision to the Colette Clover Pants. 


They checked all boxes! Well, I am partial to some diagonal hip pockets (like on khaki pants) which these pants were lacking, but otherwise these pants were just what I was looking for. And I knew that the outstanding directions in the Colette Patterns would hold my hand through the scary experience of making my first pants. 

Clovers Grading

The first step was tracing the pattern. I went with the size 18. After measuring the pattern pieces and comparing them to my own measurements, I decided to grade up the entire pattern by 4 inches- adding one inch to the center of each pattern piece. I figured it was better to be safe than sorry! 

Colette Clover

Then, it was time to cut the fabric! This was basically the cheapest stretch fabric (the Stretch Cotton Poplin in Dark Navy) that I could find on fabric.com that I thought would be wearable if the pants didn't turn out to be a total disaster. Its a little thin, but I actually think it will be super comfortable for the summer. Or these freakishly warm 50 degree days we have been having this February. You know, either way. 

Next up was the INTERFACING, which I neglected to photograph as I was so distracted by my first ever INTERFACING. Those capital letter basically sum up how I felt about it. Terrified yet excited. After some googling, it turned out fine. But I really had to talk myself into cranking that iron up high and using a LOT of steam. 

Colette Clover
oh hi, big mess under my bed. i like to pretend thats not there.

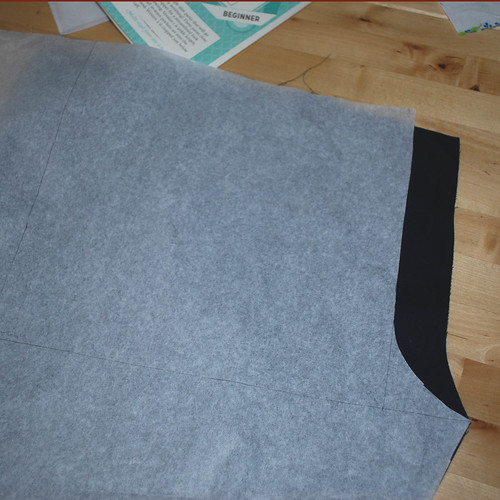
I sewed up the inner and outer leg seams and did a fit test. The front was awful, as predicted. This bunching in the crotch-al area is something that I see quite a bit when I try on pants (especially of a lighter-weight material), so I wasn't shocked. I read a LOT of stuff on the internet (I really need to get some books) and decided the problem was crotch depth. In the end, this tutorial from Sunni at A Fashionable Stitch was the most helpful one-stop-shop for help with this problem. Oh, and my bad, I guess that's a crotch depth problem. So confusing! I think they were also slightly too big in the front due to the grading up I did when cutting the fabric. Here's how I fixed it:
Clover Front Crotch Curve

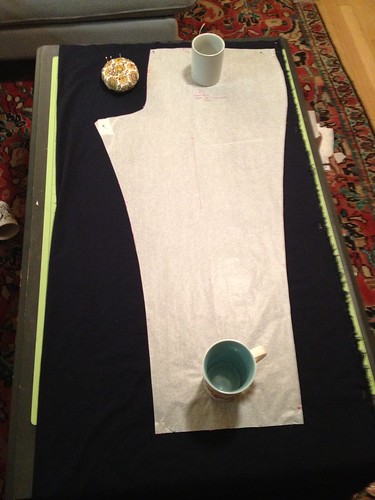
I have this legging pattern (the paper piece on top of the cut fabric) that I drafted using this tutorial on the Etsy blog (highly recommended, btw, I'll blog it eventually). I figured that since I measured myself for that pattern, the crotch measurements would work pretty well, especially since the Clover pants are supposed to be fairly tight fitting. I'm not sure if this is proper, but I basically just sewed along that line between the paper and the fabric, tried the pants back on, and it essentially fixed the problem! I think this method allowed me to fix both the crotch depth problem and it took two inches out of the center front seam that I needlessly added when I over-enthusiastically graded up the size of the pattern. There are still some wrinkles when I wear the pants, but I don't think I can totally avoid that with this very light weight fabric and my body shape. Ok, I'm not going to lie, I totally avoided dealing with the backside issues. I've never had a pair of pants that look good on my butt and I was doubtful that it would be achievable. So I gave up before I even got started. Kinda lame, but hopefully I can tackle that on my next iteration, maybe with help from some of ya'll or the lovely people at Pattern Review??? Help!!

Colette Clover

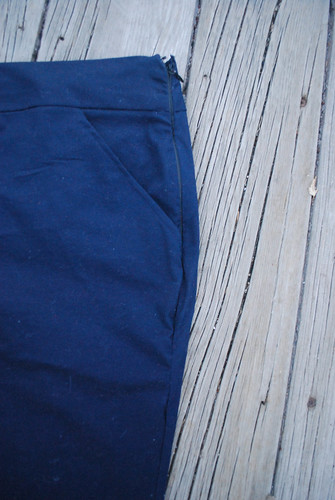
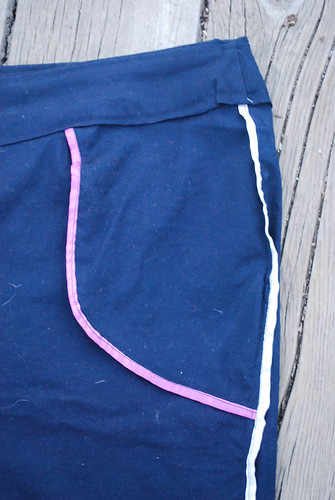
After my crotch alteration victory, I decided to get crazy and add some pockets using this tutorial from Sallieoh and this tutorial from Casey (a little easier to understand for this beginner). It was terrifying, considering I have never actually made pockets before, but I suspected I wouldn't wear the pants without pockets and the pockets that were included in the pattern aren't placed in the most flattering place for those of us with a bit of a belly. Once I got up the nerve to cut the fabric, things went pretty well. I might make the pocket bags a little bigger next time, but otherwise I think they are almost perfect (but feel free to disagree). 

Here is the finished pocket from the outside:

Clover Zipper

and the inside:

Clover Pocke

After that, I finished up the seams with some rayon seam binding using the tutorial from Lilacs & Lace and then swore that I would buy myself a serger for my 30th birthday (spoiler alert, I received one as a birthday gift and I'm contemplating a "sick" day this week to figure out how to use it).  After that, I inserted my first invisible zipper using the tutorial on the Colette blog, complete with video. Clearly, I never would have made these pants without the help from the many lovely ladies of the sewing blogosphere. I am so very grateful! The waistband went in without a hitch, thanks to the very good directions that came with the pattern. 

Clover Inside

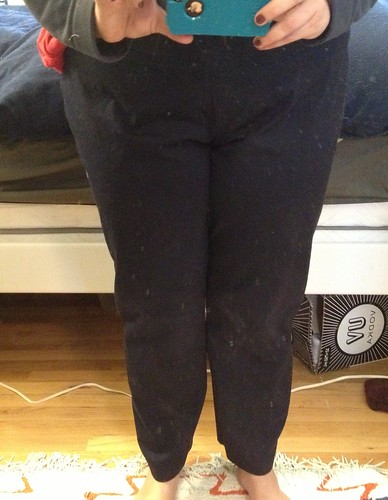
I hand sewed the hem because I thought the suggested machine method would look a bit tacky, and that was that. I really do think the front looks ok, if I do say so myself (much better than a lot of my store bought pants), and I like the length a lot (for warmer weather). But now, the horrifying moment you have all been waiting for! The horribly unflattering backside! 

Clover FrontClover Back

I'm hoping to make these up in denim ASAP (or, at least as soon as I figure out my new serger), so fitting help for the derriere would be much appreciated! Pretty much all of my store bought pants look this awful in the back (which is why you see mostly dresses when you flip through my archives), so I'm not 100% convinced its fixable. Maybe I just have an absurdly shaped ass (all evidence points to that inevitable conclusion), but I'd at least like to try to make a go at getting these pants to look good. 

And that, my dear friends, is my Clover saga. Thanks for listening!

Oh, and P.S. Am I allowed to wear these out in public? This is both the first pair of pants I have owned that is this... ahem... close fitting and the first pair of pants I have made. Thats a lot of firsts for a girl that doesn't really like pants that much. I can't decide if they are suitable for public consumption!

signature2

Thursday, January 31, 2013

Works in Progress...

I've been busy lately... too busy to post! I spent last weekend celebrating my 30th birthday by skiing and exploring the wacky and wonderful world of southern Colorado.


A crazy welded structure in Antonito, CO


Wearing (unblogged) me-made items in the new distillery in Salida, CO

Also, I finally got my vintage Singer 66-16 up and running. So excited!!!! I actually bought it about three years ago for something like 20 or 40 bucks at the thrift store, mostly because I liked the mid-century style of the table it came in. I've been using it as a side table, not realizing the amazing sewing machine hidden underneath. I was a bit intimidated by it, but I got it running with a little moral support from a dude friend and just a few tweaks. It runs soooooo smoooothly. I think it's from 1951.


In other news, I've hemmed my colette clovers and they are ready for some lights, camera, action!


I bought myself the newest Alabama Chanin Studio book for my birthday (I would link to it if I wasn't trying, mostly unsuccessfully, to write this blog post from my phone). Here is the tank top pattern getting its grade-up on.


I hope you all enjoy my amazing iPhone photo skillz.

The rest of my time has been spent working... if by working I mean reading the newest Barbara Kingsolver book on the tailgate of our work truck (I'm a geologist by trade).


That's the news for now, folks!

 signature2


Wednesday, January 23, 2013

Chevron Shirt and Gray Skirt

01.22.13

Shirt: Made by me
Skirt: Made by me
Cardigan: Target
Tights: Target
Boots: Frye

I need to start playing some major blog catch up here! I guess there isn't actually anyone telling me that I ABSOLUTELY HAVE to blog everything I've ever made. Well, no one except my internal organization freak, that is! So I'm going to try to back-blog some stuff I made in November and December, in an effort to be able to get around to some real time blogging sometime soon. I think it will be good to have as my own personal reference, even if no one else cares. 

chevron shirt gray skirt frontChevron shirt gray skirt side

So, here are two made by me items that I wore together yesterday. As I think I've mentioned before, my major impetus for starting this sewing journey is to create a wearable and comfortable wardrobe for my very casual life. I know a lot of sewing bloggers love to make beautiful and complicated dresses because they love the challenge and learning new techniques, but that really isn't what is (currently) driving me to sew. I feel like I have been sewing out of desperation these past few months. Desperation, because for years I have not been able to find the clothes that I WANT to wear in stores, and now I feel like I have the tools to make them. I'm trying to build a wardrobe here! And really, I've made great progress. Yesterday, I wore two made by me items, and I'm doing the same today. Hardly a day goes by now that I'm not wearing something that I have made, simply because the items I have made fit better and suit my needs better than anything I've bought in a long time. 

chevron shirt gray skirt sleeve

If I'm guessing right, this shirt was probably around the third thing I've made, back in November or December. It made it from the free Blank Canvas Tee Pattern by Steph at Cake Patterns/3 Hours Past. I have to say that I haven't been wild about the fit- I think there is a bit too much room in the bust for me, but I was (and still am) struggling with how to fit kimono sleeve tops. Something about it just confuses the crap out of me! 

Chevron shirt gray skirt back

 However, looking at these photos, I don't think its as bad as I thought it was! Its made of a nice drapey rayon knit from Fabulace on Etsy. That store has some seriously good prices. The print is a little crazy, but I think I like it!

chevron shirt gray skirt shirt detail

I did the suggested binding at the neckline, but I finished off the hem and the sleeves with my favorite- the double needle! I used some clear elastic to stabilize the shoulder seams.

Now, on to the skirt. I finished this up on Monday night and wore it on Tuesday, nothing better than that!

chevron shirt gray skirt skirt hem

This is basically a self drafted pattern. I printed off the free 30 Minute Skirt pattern from Make it Perfect, but after making a trial run with it in a different fabric, realized it wasn't what I was looking for. It was too high waisted, too long, and way too tight for me to feel comfortable in. Using it as a basic template, I lowered the waist, raised the hem, added some width, took some of the extreme shaping out of the hips, and added a casing for the elastic waist. Its pretty much not the same skirt anymore. I think I could still stand to make it a little more fitted, its probably a bit too baggy, but I'm not sure where my fitted skirt comfort level is.

Chevron shirt gray skirt detail

My cheap ass sewing machine is always skipping the zip zag stitches. What gives??? Is this fixable?? And yes, that thread color looks atrocious with the fabric, at some point I will rip it out and restitch with a darker thread. This is what happens when the closest sewing store is an hour away. Speaking of the closest sewing store, that's where I picked up this lovely material. Santa Fe Fabrics is the most beautiful and inspiring store, I just wish it didn't have Santa Fe prices (i.e., really high for the tourists) and that it was open later than 5:30 during the week days and not closed on Sunday. Makes it hard to feed the fabric addiction! Thank God for the internet (I make sure to do so at least once a day). Anyways, the fabric is a very nice poly/cotton/rayon blend that I got in the remnant bin, just enough for one skirt.

Chevron shirt gray skirt boots

My lovely Frye Harness boots. 

The End!

 signature2

Friday, January 18, 2013

Gray Patterned Tiramisu


gray pattern tiramisu

Dress: Made by me, Tiramisu Dress by Cake Patterns
Sweater: Anthropologie
Leggings: Sock Dreams
Boots: Vintage

Here is another dress I finished before I decided to jump on the sewing blogger wagon. I can't remember the order in which some of these projects were finished, but I think I made it back in December, sometime before Christmas. And you better believe that I have been wearing the ever-loving crap out of it ever since. When I first saw the Tiramisu Dress pattern posted about somewhere on the sewing blogosphere, that was the moment I knew that I would inevitably be sucked into the black hole of sewing. It turns out that that premonition was correct!

Oh, and before you ask. Yes, I do know that these photos were taken from an incredibly unflattering angle. I was just too lazy to find my tripod on the day I was taking the photos so I used a stool, and then once I did find the tripod, I was too lazy to retake the photos. So please add like at least a 10% more flattering filter to your eyes when viewing these photos. Thanks!

gray pattern tiramisu frontgray pattern tiramisu back

Although I do love this dress, I had some issues with the fit during construction and still have some issues with the fit now. Even though I am fairly certain that I measured myself and the pattern correctly, when I first put it together, the bodice was ABSOLUTELY ENORMOUS. I wish I had taken a photo a the time, but I was too distraught to think of it! I think part of the problem is how short-waisted I am, but I'm not sure that accounts for the whole situation that was happening! I took about 2 inches out of the shoulder seam on both the front and back and removed about another 2 inches from the bottom of the front bodice. I then had to redraft the neckline to make it wide enough to look even remotely like it was intended. I then took two inches in on each side bodice/midriff side seam. The skirt, however, fit perfectly right off the pattern and I think the suggested length is super flattering. The last adjustment I made was shortening the midriff by about half, which I knew was probably an adjustment I would have to make from the get-go. I am so short-waisted that long midriff pieces look ridiculous on me. Since I'm such a newbie, I was kind of making up these adjustments on the fly and just trying to, in the famous words of Tim Gunn, "make it work!". I'm sure there is a much better way to go about doing these modifications.

gray pattern tiramisu detail

In the end, I think I shortened the bodice a bit toooooo much. I bought some cheap jersey to make the first attempt at this dress, and it has ZERO recovery. Whoops! By the time I was done making all those bodice modifications, the material was so stretched out that I think I OVER adjusted. After a few washings, the material has recovered and the seam under the bust sits a bit high. Whoops!

Untitled

I am extremely pleased with my double needle work for the hem! BTW, this photo is a much better representation of the actual color of the dress. I-Phone camera beats the Nikon everytime! So much for expensive cameras (or maybe I should just learn how to use mine better)!

Untitled

There's the backside of the hem made with the double needle. I love the double needle, but my machine doesn't I think I've broken at least one on each project. That shit is expensive!

As for the next Tiramisu, I think I will consult Steph's 30- Minutes a Day Tiramisu Sew-a-long that she is just wrapping up right now. I can't decide if I should transfer my alterations to the pattern I have already cut in the size that I used for this dress, or try to cut a significantly smaller bodice for the next go around. All in all, I love the crap out of this dress! Though I struggled a bit with the sizing (I probably should have waited for Steph to publish the sew-a-long, but I was too impatient), I think the design is absolutely perfect for my everyday life. V-neck, jersery, pockets, and a flattering full skirt? Check, check, and check. This dress is exactly what I have been looking for. In fact, I'm wearing it right now! I see many Tiramisus in my future!
 
 signature2

Monday, January 14, 2013

Work in Progress... Colette Clover Pants

Ahhhhhhhh.  I'm practically bursting with excitement/ fear. Here is what is on my sewing table:


The Clover Pants by Colette Patterns. This is my first pair of pants! And, my first zipper insertion!

Untitled

And then, I had to get all crazy and add some slash pockets using this tutorial. 

Untitled

I think I might be insane! Thanks goodness the directions for this pattern are incredibly clearly written and aimed at a total beginner.

Finished product coming soon... hopefully they will be wearable! Pants making is terrifying!

P.S. Do you like my coffee table work station? Super classy.

 signature2