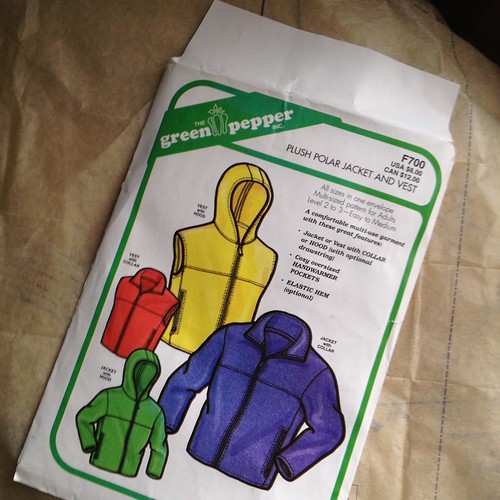
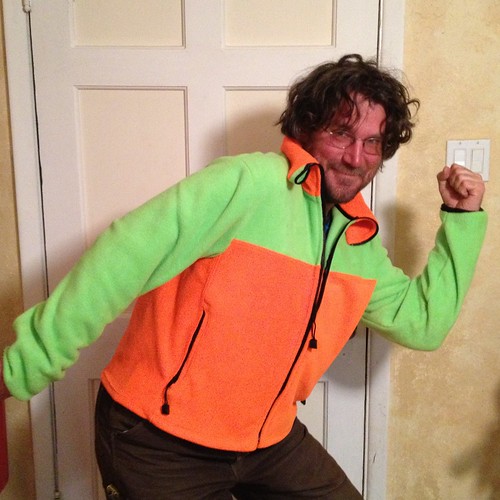
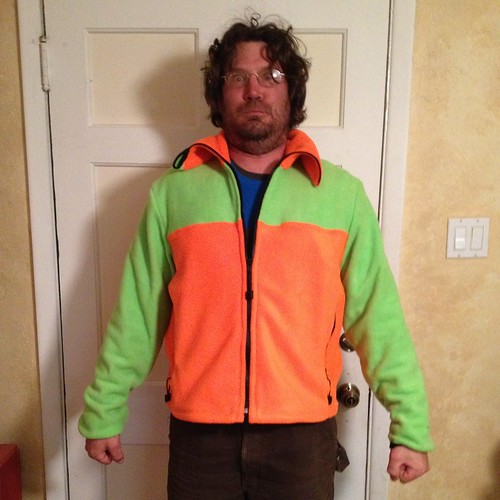
Finished! Green Pepper Patterns F700. This was QUITE a project! Lots of steps and pattern pieces and zippers and alterations, at least more than I am used to. However, the intended recipient was quite pleased- as evidenced by the demonstration below of how the jacket will look when he takes it on its first tele skiing outing to Canada in a couple of weeks.
I'll go ahead an apologize for the photos- my friend wanted the jacket in his hands as soon as it came off the sewing machine and he couldn't wait ONE SECOND longer. Hence, the after work, kinda fuzzy, hat hair, insulated carhartt wearing, iphone photos. Plus, as I'm sure ya'll know, those of the male persuasion can be a bit impatient when it comes to modeling! I think you can get the idea anyways.
This project was conceived of when said friend found himself in the unfortunate situation of having to accompany me on a trip to the fabric store. When all of the errand running is an hour away, you often find yourself going to the big city moderately sized metropolis (Santa Fe, for those of you that don't know, is only considered a big city by New Mexico standards) for lunch or dinner and then running all sorts of strange errands with other people. I have accompanied this particular friend on many trips to the guitar store and the ski shop, just so that I could have the Thai food reward at the end of the journey.
ANYWAYS, I was just planning to run into the fabric store to pick up some fabric for my mother's (yet unfinished) birthday present. We emerged and hour and a half later with this Green Pepper pattern, way too much fluorescent green and orange fleece (half off!), and three water resistant zippers. I'll have you know that this was TOTALLY his idea, apparently he has been wanting an incredibly ugly, fluorescent fleece for a long time (I think he is reliving his high school experience in the late 80s). However, I was super enthusiastic about the project, what with the claims I have been making about learning to sew outdoors gear. Plus, I owe the guy quite a few favors, he has helped me move twice, assisted with the construction of a few projects, and always drives my drunk ass around when needed!
Sorry IN ADVANCE for all the ad nauseam details, but I had a hard time finding any info on this pattern, so I want to have this a reference for both myself and for anyone else looking to use this pattern or the updated Green Pepper 507. The directions were fabulous. Actually, let's be honest, they were clearly designed for some dude who was taking his first turn at the sewing machine without his mother/wife's assistance, which was perfect for me because I have never made anything like this before.
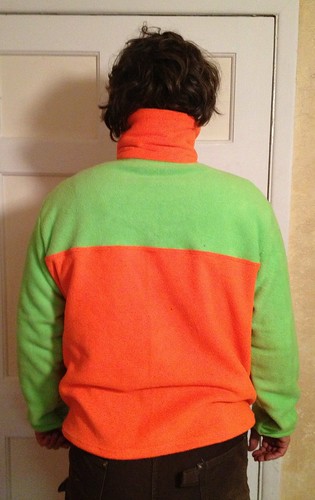
I think this is an out of print pattern, its not listed on Green Pepper's website and their pattern numbering has changed. The Plush Polar Jacket and Vest seems to be the updated version of this pattern, and it looks like it has a few more professional finish options. After reading a few reviews of the newer version on Pattern Review, I incorporated some of the finishes into the jacket. I don't know how long this pattern was sitting on the shelf at the fabric store, but I can't find any info about it online and it does have a bit of a retro look. We measured my friend and according to the pattern, we should have cut an XL. A little judicious pattern measurement suggested that we cut the size L instead, and it ended up fitting just like he wanted. We added two inches to the length through the torso and two inches to the collar height (at his request) to accommodate a 28" zipper instead of the suggested 24" zipper. FYI, I think it would have looked and functioned better if we added four inches to the torso length instead, but that is NOT what he wanted! Either way, this pattern is SHORT (he is about 6 feet tall). He also requested that we carry the color blocked yoke onto the back of the jacket. The original pattern has a solid colored back. This was easily accomplished by slashing the pattern at the same height as the yoke on the front of the jacket and adding a seam allowance.
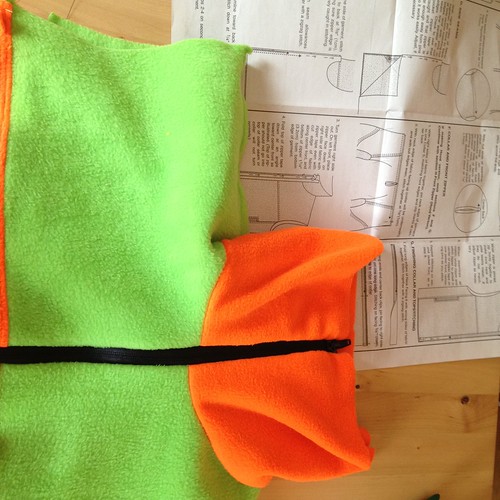
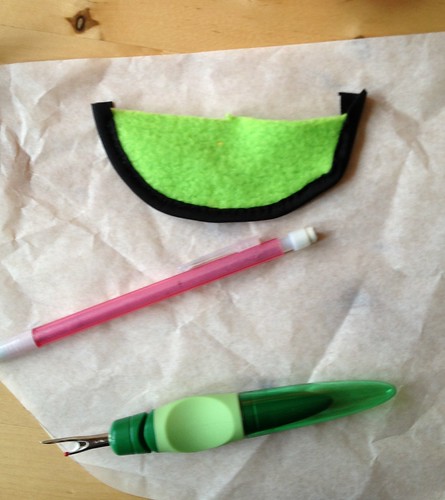
The only other request my friend made was that I include a zipper guard to keep the cold zipper pull off his face when the jacket is zipped all the way up. I did a little improv on this one. I didn't find too much info online, so I looked at a couple of my own jackets and came up with this.
I cut a half circle shape out of the fleece, edged it with Italian nylon lycra from Seattle Fabrics, and sewed it into the seam allowance at the top of the zipper. You can see the water resistant zipper nicely here, we picked this up at the fabric store and I think it looks a bit more professional than a regular zipper. You can also see my kind of shoddy topstitching- I used a 4 mm double needle and tried to use contrast thread, though it ended up that you couldn't tell at all because the thick fleece covered it up.
I also ordered some Groovy Zipper Pulls from Seattle Fabrics and got some 1/16 inch cord at my local fabric store to make zipper pulls. Its pretty hard to grab that tiny zipper when you are wearing gloves! I can't believe I forgot to take a photo of it, but I added the nylon lycra to the bottom of the sleeves following this tutorial (using the steps labeled "lycra" at the bottom of the page). I think this step really added a more professional finish; rather than just having a straight hem at the sleeves which would allow them to hang over the hands, or a band of elastic which can be tight, the lycra keeps the ends of the sleeves resting lightly above the hands. The lycra binding is what you see on the jackets made by companies like Patagonia, so it was important for me to give it a try. Surprisingly, it worked quite nicely!
Yes, the collar looks ridiculous when unzipped! But he likes it! (BTW, I'm assuming this is the face that some of your children make when you try to take their pictures. Some men never grow up!)
There are a few changes I might make next time. The pattern calls for two layers of fleece on the lower front, which are used to make a pocket that extends from the seam across the chest to the bottom hem. I've seen this construction in some professionally made jackets, but the inside piece is a mesh or lightweight nylon instead of fleece. I think this would reduce bulk and make it much easier to sew. My sewing machine did not like top stitching through 4 layers of thick fleece! I've added a small zipper guard at the top of the zipper, but most jackets have a zipper guard that extends all the way down the length of the zipper, to keep that cold zipper off your body. If I can figure out how to do it, I'll extend the zipper guard next time. Also, I'd like to lady-fy this pattern for myself. Obviously the first step will be to pick a more appealing color palette, but the second step will have to be altering the pattern. Has anyone lady-fied a men's pattern before? Any tips?
Whew, if you've made it this far you probably deserve a jacket yourself! I'll take your requests in the comments... or not!






Hahaha this post was so entertaining! Your buddy there is an excellent model. And well done :) BTW I'm totally in the process of picking out a sewing machine. You are so inspiring my dear!
ReplyDeleteYAY!! I can't wait to hear about your sewing adventures! Feel free to email if you have any questions.
DeleteWhat a fun post! This jacket is tremendously cool.
ReplyDeleteWow, great job on this Megan! What is WITH all this selfless sewing I'm seeing in the blogosphere?? ;-) Oh, thanks for the link to that zipper pull source!
ReplyDeleteLooks great and no wonder he couldn't wait to wear it... you can tell he loves it! I love the colour combination as well :)
ReplyDeleteWow, that's quite an accomplishment. I just got a sewing machine for the holidays...now I just need to figure out how to use it:) Thanks for the comment! I'm glad to see you're still blogging.
ReplyDeleteThat color combination! Wow! Lol. It looks like a fantastic jacket for skiing. And I can see that the recipient is very happy with it!
ReplyDelete